Choosing Your Basic Freedive Gear:
 Masks:
Style:The industry standard for free diving is “low volume.” You can use a scuba mask if that’s all you have, but only if you’re staying shallow (less than 20 feet). Go deeper… you’ll regret it (Bad mask hickey, bloodshot eyes, and lower bottom times because at depth it takes about half your lung volume to equalize a high volume mask).
Lens: Tempered glass or Plastic
Skirt: Black or dark silicone works best…especially for spearfishing. Why? it’s easier for your eyes to adjust when looking into caves or holes. Think of using a visor on a sunny day. You might let more light in with a clear silicon skirt, but you’ll probably miss the fish waiting for your eyes to adjust while snooping around darker areas. This also eliminates glare coming in from the sides or the mirror effect inside your lens.
Strap: No neoprene comfort straps here (that’s a scuba thing). They tend to be bulky, are less hydrodynamic and can easily slip off your head. Freedivers use a silicone or rubber strap that tucks tight around the base and top the of the head. If you’re worried about it pulling out your hair… don’t. We always wear a hooded wetsuit when we freedive. (See wetsuit selection)
Field of View test: This is important when selecting a mask for freediving (so you can visualize ahead of you while descending down the line or nearing the reef, but keeping your chin to your chest…the correct dive position), and for spearfishing (because you might just miss the fish swimming right next to you).
Test your field of view: Use two masks. Keep your head still and using your index finger, move your finger to the side until it’s at the edge of your view. Now put on the other mask without moving your head and keeping your finger in the same spot. If you still have room to move your finger until it’s out of frame, then that mask has the best field of view. Do this both: up and down, and side to side, to see which gives you the best vision.
Masks can be crazy expensive! I’ve tried far to many (about 20) and spent way too much money looking for the perfect mask. Although, a mask really comes down to personal preference and comfort. Next to your wetsuit, it’s your most important piece of equipment.
For me, I’d choose comfort and fit first and vision comes second. The mask I use and like best is the Aqua Lung Sphera. It’s one of the lowest volume, least expensive on the market, and has the best field of view I’ve tested.
 Snorkel:
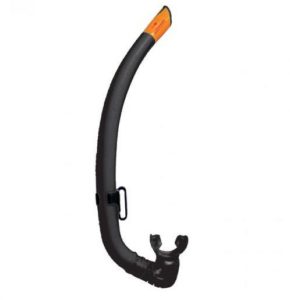
Lets make this simple. That’s all you NEED is a basic tube to go from your mouth to the air. A simple J-hook style is what you want and it’s FII recommended for freedivers. Forget the high tech SCUBA snorkels, with the fancy “hooks” and “splash guards.” These just add drag and will cost you lots. Everything in freediving is low profile, even the snorkel. That said, there are a few things that make them more comfortable…. but all in all, cheap works just as well.
Soft snorkels: I feel these are the best to get. They are very comfortable and made with a rigid yet pliable silicone or rubber that allow the snorkel to bend easily around the side of your head and contour nicely to your body when diving “snorkel out.” Some can even be folded up! They are safest when cave diving or hunting in holes because if your soft snorkel contacts the roof of the cave, it’s less likely to pull your mask off.
Rigid Snorkels:These are old school and have a stiffer shape and usually have a softer top. To give these a custom fit: mark the spots you want to bend, fill with wet sand and heat up in boiling water or (I used) a Benzomatic propane torch to gently heat the tube. Then bend the snorkel to the desired angle to fit your head and allow to cool. Warning: bending the snorkel can damage it if done wrong, and if there is a warranty, it probably voids it. Also caution using this type of snorkel diving into tight spaces, as it can remove your mask if it contacts the ceiling.
Attachment: Use a zip tie or basic snorkel keeper to attach to the back of your mask strap. We attach the snorkel in the back because when you’re face down in the water it’s the highest point on your head. Also when you dive, it allows the snorkel to contour nicely to your neck or off your back for less drag through the water.
 Wetsuits:
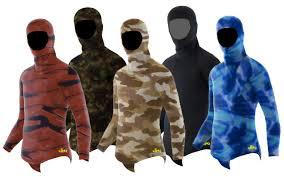
Style: Open Celled neoprene hooded wetsuit (no zippers!)- you have to lubricate these up with 7:1 baby shampoo (for on boats cause its easier to rinse off the deck) or conditioner (I like Suave, it’s cheap and easy to find. This is preferred but only on land or a swim step… it gets very slippery on boating surfaces and is hard to rinse off) to get into them.
More is better for flexibility and breathing, so don’t hold back when lubing up your wetsuit. The open cell is very flexible and will allow you to breath much easier on the surface. This suit will also compress, so it should only be used for freediving. If you use for SCUBA you’ll ruin your suit because it’ll never decompress. They can be expensive so shop around. I recommend Yamamoto 39 neoprene for durable and more affordable suits, or Yamamoto 45 for a custom fit, more warmth and greater flexibility. Definitely go with the Yamamoto 45 slick skin if you’re planning to compete.
Hood: It’ll keep you warmer, keeps the sun off you during long water sessions and covering your hair makes you much more hydrodynamic. If your wetsuit has open cell neoprene over the ears, you may need to burn a tiny hole to prevent a reverse ear squeeze. Just mark where your ears are, heat up a safety pin or a 16 penny nail with a lighter, and make a tiny hole at each ear and also at the top of the head to allow the air to escape. Heating up the pin will seal the hole to prevent further ripping, fraying or expansion of the hole.
Off the Rack: If you have an athletic build with a wider neck, OMER works great. If you have Shorter legs, SpearAmerica and Blue Tuna Spearfishing has a few good ones, so does Cressi (basically the same suit) if you have a slim neck, Nautilus mantis pro is a good one but definitely for slimmer necks (This suit choked me out). If you’re looking for top of the line off the rack slick skin competition spearfishing suit check out Blue tech. Great flexibility but fragile and expensive.
Custom: If you’re looking for a custom suit or planning to compete, check out: Oceaner (the official FII suit), Elios wetsuits, and polosub (just to name a few). These are all custom fit, high end suits. They will cost a lot, but will take your diving to the next level of comfort. After all this is your most important piece of equipment for freediving.
Prints: Most open celled neoprene suits you’ll find in shops, come in black or camo (camo is actually more common and sometimes cheaper… unless you go custom).
Remember, your wetsuit is your most important piece of equipment as a freediver (along with your mask), So even if you have to go custom, do it!
California waters, Santa Barbara to San Diego, you’re probably good with a 5mm for summer and 7mm for winter. If you tend to run hot, you may be able to get away with a 3mm and 5mm. North of Santa Barbara some might be able to sport a 5mm in the summer, but for me, it’s 7mm year round.
 Fins:
Fins:
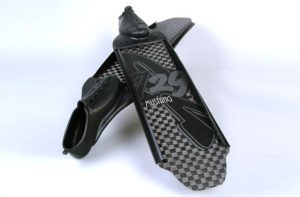
Choosing your fins: Now for the iconic symbol of freediving… long blade fins.
These fins are not made for power, but efficiency. One kick should send you flying. The whole point of a fin is to have a great recoil so the fin does most of the work and your leg just moves it.
To test the recoil of a fin: on land, hold at the foot pocket and bend the tip of the fin down toward the heal, then release. The quicker it snaps back the better.
Angle of the blade. No angle offers great energy transfer but will be hard on your ankles for surface finning. Blades with a large angle (above 22 deg) will promote a bicycle kick which is very inefficient. The Ideal angle is 22 deg. This offers you some comfort while surface finning but good transfer putting the fin back in line with your leg when it’s straight.
Length of the blade: Longer is NOT better! Your fin shouldn’t be longer than 80cm ( I like 74-78cm). The longer fins tend to create an “S” shape in the water, unless you’re really tall with a very wide kick cycle. If your fin makes an “S” shape, it stops the water from channeling away from the blade. Your fin should have a nice solid “C” curve for the best propulsion.
Plastic Fins:These are the least responsive of the 3 types of fins on the market and will require more work from your legs, causing more fatigue and decreased bottom times.
If you’re just getting into freediving and are not sure if you want to stick with it, then try it out with plastic fins. Just don’t spend more than 100-130 bucks on fins and foot pockets. Also If money is a concern, this isn’t a bad way to go. The plus side of having a set of plastic fins? You can alway use them for lobster diving or around the rocks or rocky beach entries, because you’re sure to scratch them. Then you can save your nice fiberglass or carbons for soft sand entries or boat dives.
Fiberglass fins: This is a huge step up from plastics. The response of the fin and the quality is night and day. These tend to be the choice of many Spearos due to the economic cost and durability (With foot pockets you can find them in a range from $225-$325ish)
Carbon Fiber: Expect another jump in performance. With carbon fiber, not only does your fin do most of the work, you can get a softer fin that’s much lighter weight, but still has the strength to deliver a very solid response. The benefit: your legs don’t have to work as hard, which means you burn less O2, and that can give you longer bottom times… or allow you to keep going strong after an 8 hour day of spearing. The down side, not all carbon fins are equal. Carbon although strong, are also fragile and can break easy. So if you do go pick up carbons, be sure to do your research, get good carbon and be careful with them. The other down side, you can be looking at $400-$700 dollars for a pair with pockets. Breaking one or loosing one can really ruin your day.
Finning with carbons: Your kick with carbons should be long even strokes. Unlike most fiberglass fins, if you kick harder the blade will actually start working against you and will slow you down. Smooth and steady wins the race with carbons… it saves your legs that way too.
Choosing Fin Stiffness: Most fiberglass and carbon fins come in three stiffnesses: Soft, med, and hard. Your choice in stiffness depends greatly on what you’re planning to do as well as your physiology.
Stiffness for diving: if you’re spear fishing shallow (40 feet or less), doing many repetitive dives and lots of surface fining, you might want a softer fin. If you’re spearing deeper, or just line dive training, you might go with a med stiffness fin to help bring you off the bottom. Hard or heavy stiffness is rarely used for anyone other that elite freedivers going to great depths.
Stiffness for your physiology: If you’re tall, you want to consider a softer fin regardless of strength due to a longer wider kick cycle. That longer wider cycle with a stiffer fin might make you move faster, but the power you gain you’ll loose in bottom time due to the rate of O2 consumption. It will also lead to faster leg burn. Just the opposite with people that have shorter stocker frames. Stiffer fins with smaller kick cycles might offer you a better thrust than all the kicking that would be required with softer fins to cover the same distance. That said, I always prefer softer shorter fins (80cm or less) to save my legs.
Choosing Foot pockets:
You want a foot pocket, that while holding the heal with the blade attached, it should hold the whole fin with out bending. This will offer you good energy transfer from your foot to the fin. You also want a fin that fits snug, but won’t cramp your foot.
Booties or Barefoot:In warmer waters you can go barefoot but you must buy a fin that fits you perfectly ( spearfishing for long hours? still wear a bootie, the water will make your skin easy to tear on long days spearing.)
One trick, heat up the pocket (not to the point of burning you) slip it on and allow it to cool around your foot. Then mark the pocket so you know which is left and right.
In colder water use booties or non compressible socks. When using a sock or booty in the water I suggest the use of fin keepers to get you better energy transfer, and it’ll prevent your fin from slipping off (booties compress as you go deep and your fin can slip free).
Pocket Stiffness: Some foot pockets have two stiffnesses, soft and regular. The soft feel great but must have a fin that can allow the flex and not break (good for carbons). The stiffer pockets work great, but don’t allow as much flex in the fin and work better with most fiberglass fins. The pocket can effect the stiffness of the blade too, so keep that in mind when choosing your fins.
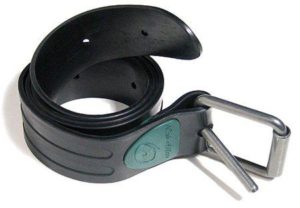 Weight Belts: Small lead weights (no more than 1 to 2 lbs each)with a RUBBERIZED weight belt that has a quick release (clamp strap or buckle). The small weights allows you to fine tune your buoyancy and achieve perfect balance in the water. No nylon SCUBA belts because they slip (nylon won’t expand and contract as you ascend and descend).
Crotch Strap: Some people have difficulty with the weights sliding up around their chest while descending. A quick fix for comfort and stability in the water is a crotch strap. It attaches to the back of the weight belt and clips onto the buckle of your quick release tongue. It’s easy to make, but can be purchased online or in shops if you want someone to make one for you.
Knife Placement: I keep my knife on my belt in front, on my straight leg when doing my water surface entry (so it doesn’t prevent movement). It’s not the easiest to access, but is less likely to snag on the kelp and is a much more hydrodynamic position than strapping to a leg or arm. For safety, your knife should be easily accessed using any hand in case of entanglement.